The Environment:
- OS on host computer: Win8.1
- OS on Raspberry Pi: Raspbian Jessie
Note, a normal RJ-45 Ethernet cable can be used to connect the Pi with the host computer because the Pi's LAN chip could reconfigure itself for direct network connections (cross-over RJ-45 cable IS NOT needed).
The diagram below shows how the Pi is connected to the host computer.

1. Enable Internet Connection Sharing (ICS) for WiFi on the host computer:


2. Connect the Pi and the host computer with a RJ-45 cable. If the Pi is not powered on, power it on now.
3. On the host computer, open up cmd prompt and type in: "ping raspberrypi.mshome.net".

The IP address of the Pi is shown, in the above case, the IP address is 192.168.137.65. Because the Ethernet port on the host computer hasn't been configured correctly, the ping result shows unreachable destination.
4. Modify the IP Address and the Subnet Mask of the Ethernet interface.


For the host computer to communicate with the Pi via the RJ-45 cable, the IP address of its Ethernet port needs to be on the same segment as the Pi's IP address (192.168.137.65). For this case, 192.168.137.1 is selected as the IP address for the host computer's Ethernet port.
5. Use the "ipconfig" command to check the IP address of the Ethernet port connected to the Raspberry Pi.

6. Use PuTTY to login to the Pi.
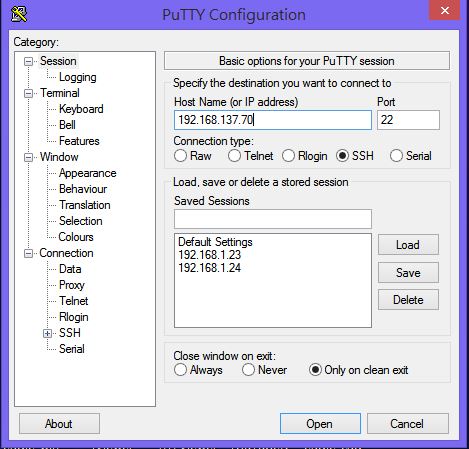
Note, you may notice the IP address 192.168.137.70 used to login to Pi is different from the IP address (192.168.137.65) in the earlier part of this post. When in doubt, use the "ping raspberrypi.mshome.net" command in cmd prompt to find the correct IP address of the Pi.
7. After login to Pi, use the ping command to check for internet connection.

Note,
It's possible to power a Pi via the USB port of a laptop. In the diagram below, the Pi and the smartphone are powered by the USB ports of a laptop.
The smartphone is acting as the gateway to the internet for the laptop via 3G / 4G tethering. The laptop then shares its internet connection with the Pi via the RJ-45 cable.

To find out the IP address of the Pi in the above configuration (for access via PuTTY, etc.), simply issue the "ping raspberrypi.mshome.net" in the cmd prompt window of the laptop.
Here, the IP address of the connected Pi is 192.168.137.46.

Lunch PuTTY and login to the Pi @ 192.168.137.46. Then, issue "ping www.google.com" to verify the connection to the internet.

Reference:
Sharing WiFi Internet connection with Raspberry Pi through LAN/Ethernet (Headless Mode)
https://anwaarullah.wordpress.com/2013/08/12/sharing-wifi-internet-connection-with-raspberry-pi-through-lanethernet-headless-mode/#Striner
Hi there. I did follow your instruction above but mine is different
ReplyDeleteC:\>ping raspberrypi.mshome.net
Pinging raspberrypi.mshome.net [192.168.137.206] with 32 bytes of data:
Reply from 192.168.137.1: Destination host unreachable.
Request timed out.
Request timed out.
I assume you are at step 3. The purpose of doing "ping raspberrypi.mshome.net" is to find the IP address of the Pi. According to the info. that you provided, the IP address of your Pi is 192.168.137.206. Did you follow through step 4 ~ 7 to see whether you could get your Pi connected to the internet via the share network?
Delete