This post contains 2 parts, the 1st one is about how to setup and test Mosquitto on Raspberry Pi. The 2nd part is about how to secure the transport layer.
OS: Raspbian used 4.4.13+.

Updating the Repository
To update the repository you need to import the repository package signing key:
pi@raspberry:~ $ wget http://repo.mosquitto.org/debian/mosquitto-repo.gpg.key
pi@raspberry:~ $ sudo apt-key add mosquitto-repo.gpg.key
Make the repository available to be installed with apt-get:
pi@raspberry:~ $ cd /etc/apt/sources.list.d/
pi@raspberrypi:/etc/apt/sources.list.d $
Then, run the following command:
pi@raspberrypi:/etc/apt/sources.list.d $ sudo wget http://repo.mosquitto.org/debian/mosquitto-jessie.list
Go back to the root directory:
pi@raspberrypi:/etc/apt/sources.list.d $ cd
pi@raspberry:~ $
Finally, update apt-get information:
pi@raspberry:~ $ sudo apt-get update
Installing Mosquitto Broker
To install the Mosquitto Broker enter the next command:
pi@raspberry:~ $ sudo apt-get install mosquitto
You’ll have to type Y and press Enter to confirm the installation.
Testing Installation
Send the command:
pi@raspberry:~ $ mosquitto -v
This returns the Mosquitto version that is currently running in your Raspberry Pi. It should be 1.4 or above.

Note: sometimes the command mosquitto -v prompts a warning message saying “1484326030: Error: Address already in use”. That warning message means that your Mosquitto Broker is already running, so don’t worry about that.
Testing MQTT Broker Installation
The next command shows how to install MQTT Mosquitto Client:
pi@raspberry:~ $ sudo apt-get install mosquitto-clients
You’ll have to type Y and press Enter to confirm the installation.
Run Mosquitto on background as a daemon:
pi@raspberry:~ $ mosquitto -d
Subscribing to testTopic Topic
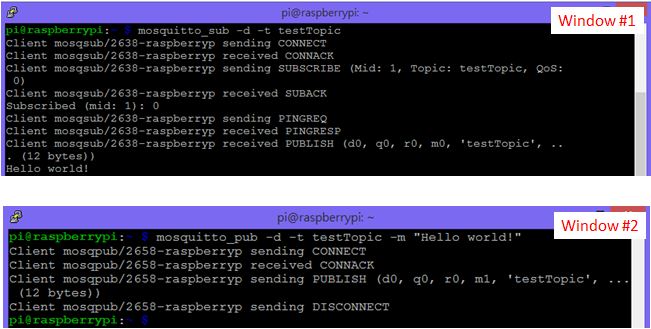
To subscribe to an MQTT topic with Mosquitto Client, open a new putty terminal (Window #1) to login to the same Raspberry Pi and enter the command:
pi@raspberry:~ $ mosquitto_sub -d -t testTopic

You’re now subscribed to a topic called testTopic.
Publishing “Hello World!” Message to testTopic Topic
To publish a sample message to testTopic, open a new putty terminal (Window #2) t login to the same Raspberry Pi and run this command:
pi@raspberry:~ $ mosquitto_pub -d -t testTopic -m "Hello world!"

The message “Hello World!” is received in Window #1 as illustrated in the figure above.
Publishing a Message to Multiple Clients
Having Window #1 still subscribed to topic testTopic, open a new putty terminal (Window #3) to login to the same Raspberry Pi and run the below command to subscribe to testTopic topic:
pi@raspberry:~ $ mosquitto_sub -d -t testTopic
On Window #2 publish the “Hello World!” message:
pi@raspberry:~ $ mosquitto_pub -d -t testTopic -m "Hello world!"
Since two clients are subscribed to testTopic topic, they will both receive “Hello world!” message.

The Next Step - Secure the transport layer
This topic will be covered in the second part of this post will reference to the below links.
MQTT Mosquitto broker with SSL/TLS transport security
https://primalcortex.wordpress.com/2016/03/31/mqtt-mosquitto-broker-with-ssltls-transport-security/
SSL/TLS Client Certs to Secure MQTT
http://rockingdlabs.dunmire.org/exercises-experiments/ssl-client-certs-to-secure-mqtt
The Mosquitto MQTT broker gets Websockets support
http://jpmens.net/2014/07/03/the-mosquitto-mqtt-broker-gets-websockets-support/
References:
How to Install Mosquitto Broker on Raspberry Pi
http://randomnerdtutorials.com/how-to-install-mosquitto-broker-on-raspberry-pi/
Testing Mosquitto Broker and Client on Raspbbery Pi
https://randomnerdtutorials.com/testing-mosquitto-broker-and-client-on-raspbbery-pi/
No comments:
Post a Comment