The Environment:
- Raspberry Pi 1 Model B
- OS: Raspbian Jessie Lite
- Primary Storage: 16GB Class 10 SD Card
MariaDB Installation
pi@raspberrypi:~ $ sudo apt-get install mariadb-server

Enter the password for the "root" user account for MariaDB (not for Raspbian). You will be prompted to enter the password again to confirm it.

pi@raspberrypi:~ $ sudo apt-get autoremove

pi@raspberrypi:~ $ sudo apt-get install libmysqlclient-dev
pi@raspberrypi:~ $ sudo apt-get install libmysqlclient-dev
Reading package lists... Done
Building dependency tree
Reading state information... Done
The following NEW packages will be installed:
  libmysqlclient-dev
0 upgraded, 1 newly installed, 0 to remove and 1 not upgraded.
Need to get 897 kB of archives.
After this operation, 4,876 kB of additional disk space will be used.
Get:1 http://mirrordirector.raspbian.org/raspbian/ jessie/main libmysqlclient-dev armhf 5.5.57-0+deb8u1 [897 kB]
Fetched 897 kB in 2s (405 kB/s)
Selecting previously unselected package libmysqlclient-dev.
(Reading database ... 31905 files and directories currently installed.)
Preparing to unpack .../libmysqlclient-dev_5.5.57-0+deb8u1_armhf.deb ...
Unpacking libmysqlclient-dev (5.5.57-0+deb8u1) ...
Processing triggers for man-db (2.7.5-1~bpo8+1) ...
Setting up libmysqlclient-dev (5.5.57-0+deb8u1) ...
pi@raspberrypi:~ $ sudo apt-get install libqt5sql5-mysql
pi@raspberrypi:~ $ sudo apt-get install libqt5sql5-mysql
Reading package lists... Done
Building dependency tree
Reading state information... Done
The following extra packages will be installed:
  libqt5core5a libqt5sql5 qttranslations5-l10n
Suggested packages:
  libthai0
The following NEW packages will be installed:
  libqt5core5a libqt5sql5 libqt5sql5-mysql qttranslations5-l10n
0 upgraded, 4 newly installed, 0 to remove and 1 not upgraded.
Need to get 2,855 kB of archives.
After this operation, 14.2 MB of additional disk space will be used.
Do you want to continue? [Y/n] y
Get:1 http://mirrordirector.raspbian.org/raspbian/ jessie/main libqt5core5a armhf 5.3.2+dfsg-4+rpi1 [1,638 kB]
Get:2 http://mirrordirector.raspbian.org/raspbian/ jessie/main libqt5sql5 armhf 5.3.2+dfsg-4+rpi1 [97.2 kB]
Get:3 http://mirrordirector.raspbian.org/raspbian/ jessie/main libqt5sql5-mysql armhf 5.3.2+dfsg-4+rpi1 [43.4 kB]
Get:4 http://mirrordirector.raspbian.org/raspbian/ jessie/main qttranslations5-l10n all 5.3.2-2 [1,077 kB]
Fetched 2,855 kB in 1min 1s (46.6 kB/s)
Selecting previously unselected package libqt5core5a:armhf.
(Reading database ... 31974 files and directories currently installed.)
Preparing to unpack .../libqt5core5a_5.3.2+dfsg-4+rpi1_armhf.deb ...
Unpacking libqt5core5a:armhf (5.3.2+dfsg-4+rpi1) ...
Selecting previously unselected package libqt5sql5:armhf.
Preparing to unpack .../libqt5sql5_5.3.2+dfsg-4+rpi1_armhf.deb ...
Unpacking libqt5sql5:armhf (5.3.2+dfsg-4+rpi1) ...
Selecting previously unselected package libqt5sql5-mysql:armhf.
Preparing to unpack .../libqt5sql5-mysql_5.3.2+dfsg-4+rpi1_armhf.deb ...
Unpacking libqt5sql5-mysql:armhf (5.3.2+dfsg-4+rpi1) ...
Selecting previously unselected package qttranslations5-l10n.
Preparing to unpack .../qttranslations5-l10n_5.3.2-2_all.deb ...
Unpacking qttranslations5-l10n (5.3.2-2) ...
Setting up libqt5core5a:armhf (5.3.2+dfsg-4+rpi1) ...
Setting up libqt5sql5:armhf (5.3.2+dfsg-4+rpi1) ...
Setting up libqt5sql5-mysql:armhf (5.3.2+dfsg-4+rpi1) ...
Setting up qttranslations5-l10n (5.3.2-2) ...
Processing triggers for libc-bin (2.19-18+deb8u10) ...
MariaDB Basic Configuration
IMPORTANT!! BE SURE TO CARRY OUT THE ACTIONS IN THIS SECTION TO IMPROVE THE SECURITY OF THE DATABASE.
pi@raspberrypi:~ $ mysql_secure_installation
Enter the password for the "root" user account which was entered in step-1 of the installation procedure.

Unless a new password is needed, enter "n" to skip the setting of a new password.

Enter "y" to delete the anonymous user account.

Normally, the answer is "y" to the question. But as I want to do something experiment, I enter "n" to allow root remote connection.
NOTE, FOR PRODUCTION VERSION, BE SURE TO CHANGE IT BACK TO "Y" TO DISALLOW ROOT REMOTE LOGIN!!

Enter "y" to delete the test database.

The privilege tables contain info. such as user accounts, passwords, privileges, etc. Enter "y" to reload them for the changes to take effect..

MariaDB Basic Operation
Launch MariaDB monitor
pi@raspberrypi:~ $ mysql -u root -p

Type "help" for a list of available built in commands. To exit or quit MariaDB, type "quit" or "\q".

Alternatively, mysqladmin can be used to manage MariaDB.
pi@raspberrypi:~ $ mysqladmin
pi@raspberrypi:~ $ mysqladmin
mysqladmin  Ver 9.1 Distrib 10.0.32-MariaDB, for debian-linux-gnueabihf on armv8l
Copyright (c) 2000, 2017, Oracle, MariaDB Corporation Ab and others.

Administration program for the mysqld daemon.
Usage: mysqladmin [OPTIONS] command command....

Default options are read from the following files in the given order:
/etc/my.cnf /etc/mysql/my.cnf ~/.my.cnf
The following groups are read: mysqladmin client client-server client-mariadb
The following options may be given as the first argument:
--print-defaults        Print the program argument list and exit.
--no-defaults           Don't read default options from any option file.
--defaults-file=#       Only read default options from the given file #.
--defaults-extra-file=# Read this file after the global files are read.

  -c, --count=#       Number of iterations to make. This works with -i
                      (--sleep) only.
  --debug-check       Check memory and open file usage at exit.
  --debug-info        Print some debug info at exit.
  -f, --force         Don't ask for confirmation on drop database; with
                      multiple commands, continue even if an error occurs.
  -C, --compress      Use compression in server/client protocol.
  --character-sets-dir=name
                      Directory for character set files.
  --default-character-set=name
                      Set the default character set.
  -?, --help          Display this help and exit.
  -h, --host=name     Connect to host.
  -l, --local         Local command, don't write to binlog.
  -b, --no-beep       Turn off beep on error.
  -p, --password[=name]
                      Password to use when connecting to server. If password is
                      not given it's asked from the tty.
  -P, --port=#        Port number to use for connection or 0 for default to, in
                      order of preference, my.cnf, $MYSQL_TCP_PORT,
                      /etc/services, built-in default (3306).
  --protocol=name     The protocol to use for connection (tcp, socket, pipe,
                      memory).
  -r, --relative      Show difference between current and previous values when
                      used with -i. Currently only works with extended-status.
  -s, --silent        Silently exit if one can't connect to server.
  -S, --socket=name   The socket file to use for connection.
  -i, --sleep=#       Execute commands repeatedly with a sleep between.
  --ssl               Enable SSL for connection (automatically enabled with
                      other flags).
  --ssl-ca=name       CA file in PEM format (check OpenSSL docs, implies
                      --ssl).
  --ssl-capath=name   CA directory (check OpenSSL docs, implies --ssl).
  --ssl-cert=name     X509 cert in PEM format (implies --ssl).
  --ssl-cipher=name   SSL cipher to use (implies --ssl).
  --ssl-key=name      X509 key in PEM format (implies --ssl).
  --ssl-crl=name      Certificate revocation list (implies --ssl).
  --ssl-crlpath=name  Certificate revocation list path (implies --ssl).
  --ssl-verify-server-cert
                      Verify server's "Common Name" in its cert against
                      hostname used when connecting. This option is disabled by
                      default.
  -u, --user=name     User for login if not current user.
  -v, --verbose       Write more information.
  -V, --version       Output version information and exit.
  -E, --vertical      Print output vertically. Is similar to --relative, but
                      prints output vertically.
  -w, --wait[=#]      Wait and retry if connection is down.
  --connect-timeout=#
  --shutdown-timeout=#
  --plugin-dir=name   Directory for client-side plugins.
  --default-auth=name Default authentication client-side plugin to use.

Variables (--variable-name=value)
and boolean options {FALSE|TRUE}  Value (after reading options)
--------------------------------- ----------------------------------------
count                             0
debug-check                       FALSE
debug-info                        FALSE
force                             FALSE
compress                          FALSE
character-sets-dir                (No default value)
default-character-set             auto
host                              (No default value)
local                             FALSE
no-beep                           FALSE
port                              3306
relative                          FALSE
socket                            /var/run/mysqld/mysqld.sock
sleep                             0
ssl                               FALSE
ssl-ca                            (No default value)
ssl-capath                        (No default value)
ssl-cert                          (No default value)
ssl-cipher                        (No default value)
ssl-key                           (No default value)
ssl-crl                           (No default value)
ssl-crlpath                       (No default value)
ssl-verify-server-cert            FALSE
user                              (No default value)
verbose                           FALSE
vertical                          FALSE
connect-timeout                   43200
shutdown-timeout                  3600
plugin-dir                        (No default value)
default-auth                      (No default value)

Where command is a one or more of: (Commands may be shortened)
  create databasename     Create a new database
  debug                   Instruct server to write debug information to log
  drop databasename       Delete a database and all its tables
  extended-status         Gives an extended status message from the server
  flush-all-statistics    Flush all statistics tables
  flush-all-status        Flush status and statistics
  flush-client-statistics Flush client statistics
  flush-hosts             Flush all cached hosts
  flush-index-statistics  Flush index statistics
  flush-logs              Flush all logs
  flush-privileges        Reload grant tables (same as reload)
  flush-binary-log        Flush binary log
  flush-engine-log        Flush engine log(s)
  flush-error-log         Flush error log
  flush-general-log       Flush general log
  flush-relay-log         Flush relay log
  flush-slow-log          Flush slow query log
  flush-status            Clear status variables
  flush-table-statistics  Clear table statistics
  flush-tables            Flush all tables
  flush-threads           Flush the thread cache
  flush-user-statistics   Flush user statistics
  flush-user-resources    Flush user resources
  kill id,id,...        Kill mysql threads
  password [new-password] Change old password to new-password in current format
  old-password [new-password] Change old password to new-password in old format
  ping                  Check if mysqld is alive
  processlist           Show list of active threads in server
  reload                Reload grant tables
  refresh               Flush all tables and close and open logfiles
  shutdown              Take server down
  status                Gives a short status message from the server
  start-slave           Start slave
  stop-slave            Stop slave
  variables             Prints variables available
  version               Get version info from server
Note,
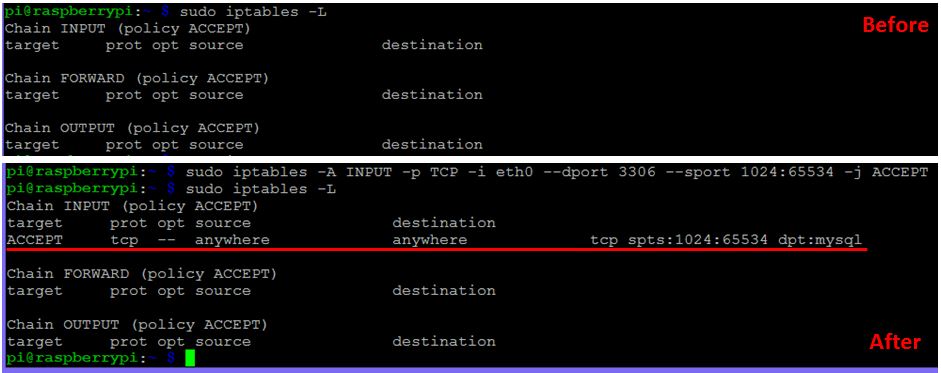
If MariaDB is placed behind firewall, be sure to to open port 3306 to allow users / applications to access the database.
pi@raspberrypi:~ $ sudo iptables -A INPUT -p TCP -i eth0 --dport 3306 --sport 1024:65534 -j ACCEPT
Below is the iptables before and after executing the above command.
pi@raspberrypi:~ $ sudo iptables -L
In case the Pi is having trouble executing the iptables command (especially on a machine running newly installed OS or machine with OS hasn't been updated for a long time), please refer to the below section on how to upgrade the OS.
--------------------------------------------------------------------------------------------------------------------------
Troubleshooting problem running iptables
The Problem:
Running sudo iptables -L results in error.

The Solution: Upgrade Raspbian
Check current version
uname -a
See a list of upgradable packages
pi@raspberrypi:~ $ sudo apt list --upgradable

Perform the upgrade
pi@raspberrypi:~ $ sudo apt upgrade

Note, plymouth is the startup logo package for Raspbian.

Check again the current version after the upgrade.
uname -a

Reboot the system then check again the version info.
sudo reboot
uname -a

The version has been updated!!
Try running "sudo iptables -L" again. This time, there is no error!!

Reference:
iptables: nat table does not exist
https://raspberrypi.stackexchange.com/questions/51276/iptables-nat-table-does-not-exist
--------------------------------------------------------------------------------------------------------------------------
phpMyAdmin Installation
pi@raspberrypi:~ $ sudo apt-get install phpmyadmin
Select "y" to continue the installation.

Select apache2 (note, use up / down arrow key to select, use space key to confirm, use tab key to switch between the 2 options and OK).

Select "Yes".

Enter the password for the MariaDB.

Enter the password that you want to use for phpmyadmin.

Re-enter the password to confirm it.

phpMyAdmin Configuration
Now, we need to combine apache with phpMyAdmin. For that, you should edit the apache2.conf file. For that, type the following in the terminal:
pi@raspberrypi:~ $ sudo nano /etc/apache2/apache2.conf
At the end of this file (navigate using Ctrl+V), add a line:
Include /etc/phpmyadmin/apache.conf

Use Ctrl + X to save the change and exit nano.
Now restart the server using:
sudo /etc/init.d/apache2 restart

Now, check out the link in your web browser: <pi’s ip address>/phpmyadmin or localhost/phpmyadmin in your Pi. You should see the page below.

IMPORTANT!! - The login info. (Username and Password) needed is for MariaDB, not for phpMyAdmin so you need to enter the Username and Password for MariaDB..
Once the correct Username and Password are entered, the below screen will appear.

Note,
On the bottom of the above screen there is this message "Your PHP MySQL library version 5.5.57 differs from your MySQL server version 10.0.32. This may cause unpredictable behavior."
To solve this problem, issue the 2 commands below in the terminal then restart apache2 and mysql (or simply do a reboot of the system).
pi@raspberrypi:~ $ sudo apt-get update
pi@raspberrypi:~ $ sudo apt-get install php5-mysqlnd
The warning message disappears after the update is done and a reboot is performed.

References:
ติดตั้ง MariaDB (MySQL) Database on Raspberry Pi ตอนที่ 1
https://youtu.be/BZO1M7SjmBY
Raspberry Pi 的實作 - MySQL / MariaDB 資料庫的安裝與基本設定
http://blog.itist.tw/2015/02/raspberry-pi-install-mysql-or-mariadb.html
***How to Make a Raspberry Pi Web Server***
https://diyhacking.com/raspberry-pi-web-server/
Your PHP MySQL library version 5.5.50 differs from your MySQL server version 5.6.31. This may cause unpredictable behavior.
https://www.digitalocean.com/community/questions/your-php-mysql-library-version-5-5-50-differs-from-your-mysql-server-version-5-6-31-this-may-cause-unpredictable-behavior
--------------------------------------------------------------------------------------------------------------------------
MySQL修改 root 密碼必勝方法
https://blog.toright.com/posts/1145/mysql-%E6%94%B9-root-%E5%AF%86%E7%A2%BC%E5%BF%85%E5%8B%9D%E6%96%B9%E6%B3%95%EF%BC%88%E7%AD%86%E8%A8%98%EF%BC%89.html
忽然忘記 MySQL的 root 密碼,或者 CentOS 剛裝好的時候在 root 密碼尚未設定的狀態下都可以透過以下方法來修改 root 密碼。
MySQL 無法使用 root 連線,先來看看發生什麼事情:
[root@centos ~]# mysql -u root -p
Enter password:
ERROR 1045 (28000): Access denied for user 'root'@'localhost' (using password: NO)
[root@centos ~]# mysqladmin -u root -p password
Enter password:
mysqladmin: connect to server at 'localhost' failed
error: 'Access denied for user 'root'@'localhost' (using password: NO)'
[root@centos ~]#
既然 mysqladmin 也改不了密碼了,那我們只好重新啟動MySQL並且進入安全模式,這時候就可以不用 root 密碼登入了。
[root@centos ~]# service mysqld stop
正在停止 MySQL: [ 確定 ]
[root@centos ~]# mysqld_safe --user=mysql --skip-grant-tables --skip-networking &
[1] 27349
Starting mysqld daemon with databases from /var/lib/mysql
[root@centos ~]# mysql -u root mysql
Reading table information for completion of table and column names
You can turn off this feature to get a quicker startup with -A
Welcome to the MySQL monitor. Commands end with ; or \g.
Your MySQL connection id is 1
Server version: 5.0.77 Source distribution
Type 'help;' or '\h' for help. Type '\c' to clear the buffer.
mysql> UPDATE user SET Password=PASSWORD('iamroot') where USER='root';
Query OK, 3 rows affected (0.02 sec)
Rows matched: 3 Changed: 3 Warnings: 0
mysql> FLUSH PRIVILEGES;
Query OK, 0 rows affected (0.00 sec)
mysql> quit
Bye
[root@centos ~]#
重新將 MySQL啟動在正常模式,並且測試新的 root 密碼是否能夠使用。
[root@centos ~]# service mysqld restart
STOPPING server from pid file /var/run/mysqld/mysqld.pid
101220 16:58:31 mysqld ended
正在停止 MySQL: [ 確定 ]
正在啟動 MySQL: [ 確定 ]
[1]+ Done mysqld_safe --user=mysql --skip-grant-tables --skip-networking
[root@centos ~]# mysql -u root -p
Enter password:
Welcome to the MySQL monitor. Commands end with ; or \g.
Your MySQL connection id is 2
Server version: 5.0.77 Source distribution
Type 'help;' or '\h' for help. Type '\c' to clear the buffer.
mysql>
搞定。
----------------------------------------------------------------------------------------------------------------------------------
https://youtu.be/tkeMgUFTAaE
No comments:
Post a Comment