Testing the Python backend connection with MariaDB and MQTT
Check to make sure "mqtt_websockets.py" is in the current directory.
pi@raspberrypi:~ $ ls
mosquitto-1.4.14         mqtt_websockets.py     paho.mqtt.python
mosquitto-1.4.14.tar.gz  openssl-1.0.1t         SimpleWebSocketServer.py
mosquitto-repo.gpg.key   openssl-1.0.1t.tar.gz  SimpleWebSocketServer.pyc
Run "mqtt_websockets.py".
pi@raspberrypi:~ $ python mqtt_websockets.py
MySQL Connected
MySQL Connected
MySQL Connected
MySQL Connected
MQTT Connected...
Note, Make sure the "mqtt_websockets.py" has been configured according to your MariaDB and MQTT settings. Refer to part 1 of this series for details.
Setting up the frontend (webpage)
The tasks below are to be performed on the same Raspberry Pi that hosts the MariaDB, phpMyAdmin, and MQTT Broker.
1. Change working directory to "/var/www/html"
pi@raspberrypi:~ $ cd /var/www/html
pi@raspberrypi:/var/www/html $ ls
pi@raspberrypi:~ $ cd /var/www/html
pi@raspberrypi:/var/www/html $ ls
index.html
2. Delete the index.html file using "sudo rm index.html".
pi@raspberrypi:/var/www/html $ ls
index.html
pi@raspberrypi:/var/www/html $ rm index.html
rm: remove write-protected regular file ‘index.html’? y
rm: cannot remove ‘index.html’: Permission denied
pi@raspberrypi:/var/www/html $ sudo rm index.html
pi@raspberrypi:/var/www/html $ ls
pi@raspberrypi:/var/www/html $
3. Download and save "HAC.-7-MQTT-to-Webpages" and its files to your computer from this link - https://github.com/shaneyake/shaneyake/tree/master.

Inside "HAC.-7-MQTT-to-Webpages".

Inside "HAC.-7-MQTT-to-Webpages/html".

4. Change the permission for "/var/www/html". Otherwise, you will run into error in the next step
pi@raspberrypi:/var/www/html $ sudo chmod 777 -R /var/www/html/
5. From your computer, use WinSCP or FileZilla to copy all the files under "\HAC.-7-MQTT-to-Webpages\html" to Raspberry Pi under "/var/www/html/".
Before

After

6. Edit the "index.php" in "/var/www/html".
Enter the red texts to the fields below.
7. Login to phpMyAdmin from the web browser then click on Users.

8. Click on Add user.
Enter the username and select the server type as entered in step 6 above. Click on the "Generate" button to generate password for the account.
Copy the password generated (in this case - "Ztx47yVEXKQ5LY2c") for later use.

Scroll down to check all check boxes under "Data", then click Go to create the account.

The account for user "web" is now created.

9. Paste the password generated in step-8 above (in this case - "Ztx47yVEXKQ5LY2c") to the MYSQL_PASSWORD field of index.php.
Use ctrl-x to save the change and exit the editor.
Use a browser to visit the IP address of the Raspberry Pi and the below login screen will appear.
 10. Go back to phpMyAdmin, click on HAC then click on SQL.

Go to https://github.com/shaneyake/shaneyake/tree/master/HAC.-7-MQTT-to-Webpages and copy the entire highlighted section.

6. Edit the "index.php" in "/var/www/html".
Enter the red texts to the fields below.
pi@raspberrypi:/var/www/html $ cat index.php
<?php
session_start();$run='test:code';
$MYSQL_SERVER='localhost';
$MYSQL_USERNAME='web';
$MYSQL_PASSWORD='';
$MYSQL_DATABASE='HAC';

$page='dashboard';
if($_SESSION["USER_VAILD"] == "vaild"){
        if($_GET['p']!=''){$page=$_GET['p'];}
}else{
        $page="login";
    if($_GET['p']=='login_proccess'){$page='login_proccess';}
}
include $page.'.php';
?>
7. Login to phpMyAdmin from the web browser then click on Users.

8. Click on Add user.
Enter the username and select the server type as entered in step 6 above. Click on the "Generate" button to generate password for the account.
Copy the password generated (in this case - "Ztx47yVEXKQ5LY2c") for later use.

Scroll down to check all check boxes under "Data", then click Go to create the account.

The account for user "web" is now created.

9. Paste the password generated in step-8 above (in this case - "Ztx47yVEXKQ5LY2c") to the MYSQL_PASSWORD field of index.php.
pi@raspberrypi:/var/www/html $ cat index.php
<?php
session_start();$run='test:code';
$MYSQL_SERVER='localhost';
$MYSQL_USERNAME='web';
$MYSQL_PASSWORD='Ztx47yVEXKQ5LY2c';
$MYSQL_DATABASE='HAC';

$page='dashboard';
if($_SESSION["USER_VAILD"] == "vaild"){
        if($_GET['p']!=''){$page=$_GET['p'];}
}else{
        $page="login";
    if($_GET['p']=='login_proccess'){$page='login_proccess';}
}
include $page.'.php';
?>
Use ctrl-x to save the change and exit the editor.
Use a browser to visit the IP address of the Raspberry Pi and the below login screen will appear.


Go to https://github.com/shaneyake/shaneyake/tree/master/HAC.-7-MQTT-to-Webpages and copy the entire highlighted section.
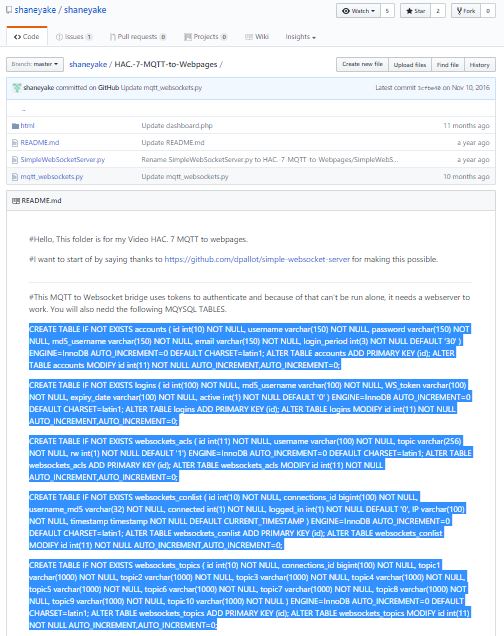
Paste the copied section as shown below then click the Go button. The pasted code programmatically creates tables.

Click on HAC to see the newly created tables (in red squares).

11. Click on the accounts table, then click on insert to create a new account.

12. Enter the username for the account. Use MD5 generator such as the one from Miracle Salad - http://www.miraclesalad.com/webtools/md5.php to generate the md5_username.

Enter the username in the String field, the md5_username will appear below..

Copy and paste the username's MD5 Hash to the md5_username field.

For password, I choose to use "54321" for this post. Put the password in the String field to get the MD5 Hash version.

Copy and paste the password's MD5 Hash to the password field.

Note, The MD5 Hash can be easily reversed.
Click on Go to create the account. The newly created account is shown below.

13. Reload the page. Enter the username (weihsiung) and password (54321) to login.


The Solution
The above error is caused by missing websockets.
Go back to the home directory then launch "mqtt_websockets.py".
pi@raspberrypi:/ $ cd ~
pi@raspberrypi:~ $ ls
mosquitto-1.4.14         mqtt_websockets.py     paho.mqtt.python
mosquitto-1.4.14.tar.gz  openssl-1.0.1t         SimpleWebSocketServer.py
mosquitto-repo.gpg.key   openssl-1.0.1t.tar.gz  SimpleWebSocketServer.pyc
pi@raspberrypi:~ $ python mqtt_websockets.py
MySQL Connected
MySQL Connected
MySQL Connected
MySQL Connected
MQTT Connected...
Reload the webpage and re-enter the username and password. And, the problem is solved.

Below is the screenshot of the terminal running "mqtt_websockets.py".
pi@raspberrypi:~ $ python mqtt_websockets.py
MySQL Connected
MySQL Connected
MySQL Connected
MySQL Connected
MQTT Connected...
Connected <__main__.SimpleChat object at 0xb61acbd0>
3055209424
{}
Connected FOR GOOD
New Message
{"mode": "login", "ws_token":"e7bb41d5e9d9cc740eecde97a5526dd4"}
{u'ws_token': u'e7bb41d5e9d9cc740eecde97a5526dd4', u'mode': u'login'}
Allowed 3055209424
IP: 192.168.2.4
Now we have a working frontend (webpage) that can talk to the backend (MQTT Broker and MariaDB). Three cheers to ShaneYake. I won't be able to do it without his great work..
Creating account for the actual interaction
At the end of step-13, if we try to subscribe or publish, the system will refuse such action and give out "SUBSCRIBED_DENIED" or "PUBLISHED_DENIED".

This is so because the mqtt_acls and websockets_acls are designed to be separated to distinguish between MQTT users and online users. Online users are web users, while MQTT users are Raspberry Pi, Sensors, etc.
To allow web users to access MQTT, do the following.
1. Login to phpMyAdmin.
2. Click on accounts, then click on Edit.

3. Copy the md5 version of the username. In this case, it's "1765bd90eeea7717445d7f832720dcc6".

4. Click on websockets_acls, then click on Insert.
- Paste the copied md5 username from the above step to the username field;
- Enter "hello/world" for topic;
- Enter 2 for rw (0 -> no access, 1 -> has the read privilege, 2 -> has the write privilege).

- Click Go to save the change.

5. Go back to the webpage where the requests for subscription and publishing were denied.
Enter the texts in the Subscribe and the Publish fields as shown in the pic below. This time the subscription and publishing requests are accepted.

References:
HAC 7. MQTT to Webpages
https://www.youtube.com/watch?v=n3F7auYZqPY
No comments:
Post a Comment