Download OS Image
Download the OS image from the link below.
https://www.raspberrypi.org/downloads/raspbian/
For my application, I use the lite version.

Write the OS image to SD Card
Use tools such as win32imagewriter or balenaEtcher to write the image to an SD Card.
Enable SSH
For security reasons, ssh is no longer enabled by default. To enable it you need to place a blank text file called "ssh" in the root of the boot SD by doing the following:
1. Run Notepad;
2. In a new file put in one space and nothing more;
3. Click File / Save As ...;
4. Be sure to set Save as type to All Files (so the file is NOT saved with a .txt extension);
5. Call the file "ssh" and save it;
6. Close the file.

Add Network Info
To add network info you need to create a second text file called wpa_supplicant.conf and place that in the root of the boot SD too.
1. Run Notepad;
2. Paste in the contents below (adjusting for the name of your country code, network name and network password):
country=US
ctrl_interface=DIR=/var/run/wpa_supplicant GROUP=netdev
update_config=1
network={
ssid="NETWORK-NAME"
psk="NETWORK-PASSWORD"
}
3. Click File / Save As ...
4. Be sure to set Save as type to All Files (so the file is NOT saved with a .txt extension)
5. Call the file wpa_supplicant.conf and save it
6. Close the file

Connect to your board
Insert the SD card into the Pi Zero W and connect it to a power source; a Micro-USB power cable into the power port will do the trick. Once it powers up it takes some time to boot and connect to the WiFi, usually from 45 to 90 seconds.
Using nmap or a network scanner like "Advanced IP Scanner" you have to obtain the new device connected to your network. The Pi also exposes raspberrypi as a hostname. Using the IP address you can SSH your board as:

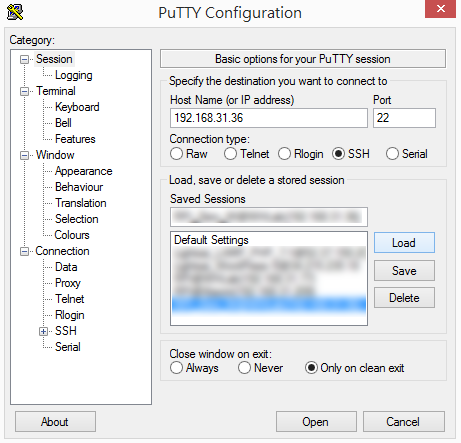
Launch PuTTY, enter the IP address found above and set the port number to 22 (default SSH port), then click the Open button to connect.
Click "Yes" when you see a warning message similar to the one below.

Enter the default username (pi) and password (raspberry) when prompted. After which you are ready to go.

Upgrade the installed packages
sudo apt-get update
sudo apt-get upgrade or sudo apt-get dist-upgrade
or, you could combine the two commands into a one liner.
sudo apt-get update && sudo apt-get dist-upgrade
Check disk usage
Use the df command to show the amount of disk space used and available on Linux file systems.
On an 8GB SD Card, there is around 5.6GB available space left after a fresh installation of Raspban Buster Lite.
pi@raspberrypi:~ $ df
Filesystem     1K-blocks    Used Available Use% Mounted on
/dev/root        7366160 1448168   5583152  21% /
devtmpfs          217212       0    217212   0% /dev
tmpfs             221540       0    221540   0% /dev/shm
tmpfs             221540    5908    215632   3% /run
tmpfs               5120       4      5116   1% /run/lock
tmpfs             221540       0    221540   0% /sys/fs/cgroup
/dev/mmcblk0p1    258095   53463    204632  21% /boot
tmpfs              44308       0     44308   0% /run/user/1000
pi@raspberrypi:~ $
Reference:
HEADLESS PI ZERO W WIFI SETUP (WINDOWS)
https://desertbot.io/blog/headless-pi-zero-w-wifi-setup-windows
Getting Started with the Raspberry Pi Zero Wireless
https://learn.sparkfun.com/tutorials/getting-started-with-the-raspberry-pi-zero-wireless/all
Headless Raspberry Pi Zero W Setup
https://dev.to/vorillaz/headless-raspberry-pi-zero-w-setup-3llj
Raspberry Pi Zero Time-Lapse Camera
https://projects.raspberrypi.org/en/projects/raspberry-pi-zero-time-lapse-cam/3
What does “sudo apt-get update” do?
https://askubuntu.com/questions/222348/what-does-sudo-apt-get-update-do
No comments:
Post a Comment