Showing posts with label Raspberry Pi. Show all posts

2020/02/18

Raspberry Pi - Add support for power on / off button

This post is a quick write up of me following the instruction here to create an on/off button for switching on/off the PI. When the PI is running, connecting GPIO3 to GND will cause the system to send out the sudo shutdown -h now command to switch off the PI. When the PI is not running, connecting GPIO3 to GND will cause the PI to wake up and start running.

***IMPORTANT!! This is extremely important to shut down the PI using the sudo shutdown -h now command to avoid corrupting the file system of the SD Card. If you experience trouble booting the PI after a sudden power outage, chances are the SD file system is corrupted and you will have to write a new Raspbian image to the SD Card and re-configure the Raspbian if a backup image is not available ***


2020/02/17

Raspberry Pi - Headless installation of Raspbian OS on Raspberry Pi Zero W

This post is about how to install Raspbian OS onto Raspberry Pi Zero W headlessly (without physically attaching monitor, keyboard, and mouse to the Pi Zero W).

Download OS Image

Download the OS image from the link below.

https://www.raspberrypi.org/downloads/raspbian/

For my application, I use the lite version.


Raspberry Pi - How to run a program on startup

This is a quick write up of me following the instruction here to test out how to use the GPIO of Raspberry Pi and make a program to auto-execute on startup.

Wiring Diagram

Wire up the Pi with an LED and a resistor as shown below.


Raspberry Pi - How to mount an USB Flash Drive

This is a quick write up of me following the instruction below on how to mount an USB Flash Drive to my Raspberry Pi.

How To Mount A USB Flash Disk On The Raspberry Pi
https://www.raspberrypi-spy.co.uk/2014/05/how-to-mount-a-usb-flash-disk-on-the-raspberry-pi/


2019/06/08

Wordpress on Raspberry Pi - Solving the page not found issue when using permalink

This post is about how to solve the page not found problem when using the Permalinks feature of Wordpress.


My Environment

pi@raspberrypi:/ $ lsb_release -a
No LSB modules are available.
Distributor ID: Raspbian
Description:    Raspbian GNU/Linux 9.9 (stretch)
Release:        9.9
Codename:       stretch
pi@raspberrypi:/ $

2017/10/03

Raspberry Pi - How to check whether PHP is installed and its version

This is a quick summary of how to check whether PHP is installed and its version.

1. Login to your Raspberry Pi.

2. Change the working directory to "/var/www/html".

2017/08/28

Raspberry Pi - Setting up MQTT to send and receive from webpage - Part 1 / 2

This post is the first of a 2-part series on how to set up MQTT to send and receive messages from webpage.

Preparing the Environment

1. From your computer, clone the repository of https://github.com/shaneyake/shaneyake/tree/master  and save the downloaded files to your computer for later use.

Raspberry Pi - Create new MariaDB database using phpMyAdmin

This post is about how to create new MariaDB database using phpMyAdmin. The database created will later be used as the storage for MQTT messages

Create New Database and Tables

1. Login to phpMyAdmin as root.

2. Enter the name of the database to be created than click on Create.


2017/08/26

Raspberry Pi - How to check the installed OpenSSL version

This post is about how to check and upgrade the OpenSSL installed on Raspbian Jessie Lite.

Checking the installed OpenSSL

Checking the version of Raspbian Jessie installed.

pi@raspberrypi:~ $ uname -a

pi@raspberrypi:~ $ uname -a
Linux raspberrypi 4.9.35+ #1014 Fri Jun 30 14:34:49 BST 2017 armv6l GNU/Linux

To check the OpenSSL version that is being used by the system.

Raspberry Pi - Installation and configuration of MariaDB and phpMyAdmin on Raspbian Jessie Lite

This post is a quick summary of how to install MariaDB on Raspberry Pi running Raspbian as well as on how to perform basic configuration and operation.

The Environment:

- Raspberry Pi 1 Model B
- OS: Raspbian Jessie Lite
- Primary Storage: 16GB Class 10 SD Card

2017/05/20

Mosquitto on Raspberry Pi - Part 1, Installing and testing

This post is a record of my experiment following the posts on Random Nerd Tutorial. The links to the posts that I followed can be found at the end of this post.

This post contains 2 parts, the 1st one is about how to setup and test Mosquitto on Raspberry Pi. The 2nd part is about how to secure the transport layer.

OS: Raspbian used 4.4.13+.


2016/11/29

2016/08/24

How to use the UART of Raspberry Pi for wireless communication - part 2

This is a quick summary of how to connect Raspberry Pi to a 433MHz Serial to Wireless module (HC-11 / HC-12) and how to program the Pi using Python to receive incoming data.

Before the Pi's UART can be used for this purpose, there are some preparations that need to be made. Please refer to http://wei48221.blogspot.tw/2016/08/how-to-use-uart-of-raspberry-pi-for_99.html for info. on how to prepare the Pi's UART.

Schematic:


Checking the version of the installed Python.

Issue "python --version".


Install pySerial

Issue "sudo apt-get install python-serial".

Other preparation works

Create a folder call "python" (if it hasn't been created) to keep the python programs.

1. Issue "mkdir python" to create the python folder.

2. Issue "ls" to make sure the folder is created.


Change working directory to the newly created python folder.

"cd python"

Launch nano text editor and name the file created "serial_read.py"

"nano serial_read.py"

Code

Type in the code between the 2 dash lines.
----------------------------------------------------------------------------------------------------------------------
#!/usr/bin/env python

import time
import serial

ser = serial.Serial(
         port='/dev/ttyAMA0',
         baudrate = 9600,
         parity=serial.PARITY_NONE,
         stopbits=serial.STOPBITS_ONE,
         bytesize=serial.EIGHTBITS,
         timeout=1
         )
counter=0
   
while 1:
         x=ser.readline()
         print x
---------------------------------------------------------------------------------------------------------------------
IMPORTANT!!

Watch out for the indent as python uses spacing at the start of the line to determine when code blocks start and end (http://stackoverflow.com/questions/1016814/what-to-do-with-unexpected-indent-in-python).

Save the program.
Ctrl-X to exit the editing mode, then "Y" to save the file.

Running the program 

"python serial_read.py".

Here I have an Arduino Uno with some sensors and a HC-11 module attached to it. Whenever a sensor is triggered, the Uno will send a message out via the HC-11 module. The message is picked up by the "serial_read.py " running on the Raspberry Pi and displayed in the PuTTY terminal.


When we are done with the program, use Ctrl-C to stop its execution.

References:

Using UART on Raspberry Pi – Python
https://electrosome.com/uart-raspberry-pi-python/

Arduino Lesson 17. Email Sending Movement Detector
https://learn.adafruit.com/arduino-lesson-17-email-sending-movement-detector/python-code

Read and write from serial port with Raspberry Pi
http://www.instructables.com/id/Read-and-write-from-serial-port-with-Raspberry-Pi/

---------------------------------------------------------------------------------------------------------------------

Product Offered:

Note, the 2 modules listed here have been tested to work with Arduino Uno and Raspberry Pi.

433MHz Serial RF Module -- HC-11


- Price: US$6.99/ea;
- Item Location: Taipei, Taiwan;
- Range: ~100 Meters (direct line of sight without obstruction);
- Frequency: 433MHz;
- Operating Voltage: DC 3.3V ~ 5V (when feeding DC 3.3V to the VCC of the module, the module works with Raspberry Pi without the need for level shifting / voltage division);
- Serial baud rate: 1.2Kbps to 115.2Kbps (default 9.6Kbps);
- Interface protocol: UART/TTL;
- At least 2 HC-11 modules are needed to form a complete wireless link.

IMPORTANT - THIS MODULE DOESN'T WORK WITH THE 433MHz Serial RF Module HC-12.

-------------------------------------------------------------------------------------------------------------------------

433MHz Serial RF Module -- HC-12
- Price: US$7.99/ea;
- Item Location: Taipei, Taiwan;
- Range: ~1000 Meters (@ 5000bps) direct line of sight without obstruction);
- Frequency: 433MHz;
- Operating Voltage: DC 3.3V ~ 5V (when feeding DC 3.3V to the VCC of the module, the module works with Raspberry Pi without the need for level shifting / voltage division);
- Serial baud rate: 1.2Kbps to 115.2Kbps (default 9.6Kbps);
- Interface protocol: UART/TTL;
- At least 2 HC-12 modules are needed to form a complete wireless link.

IMPORTANT - THIS MODULE DOESN'T WORK WITH THE 433MHz Serial RF Module HC-11.

How to purchase:

Leave your message in the comment section below or send me an e-mail. I will contact you for detail.

2016/08/23

How to use the UART of Raspberry Pi for wireless communication - part 1

This post is the 1st part of a 2-part series on how to use the UART of Raspberry Pi for wireless communication.

This post is mainly about how to prepare the UART of Raspberry Pi. The Pi used is Raspberry Pi 1 Model B and the OS used is Raspbian Jessie.

For info. on the python environment, python serial, and the actual code, please refer to the post at http://wei48221.blogspot.tw/2016/08/how-to-use-uart-of-raspberry-pi-for_30.html.

Raspberry Pi 1 Model B


Raspberry Pi 1 Model B Specs.

Raspberry Pi 1 Model B Pin Map (from Sparkfun)


Step 1 - Check to see if the UART pins (GPIO 14 and 15) are configured as serial console which outputs all the kernel data during boot.

Issue the command "dmesg | grep tty" and observe the output.

The line with red underline indicates that the UART is configured as serial console.


Note, if you are using Pi model 3 do not use /dev/ttyAMA0 because it's assigned to bluetooth, use /dev/ttyS0 instead.

Step 2 - Free up the UART Pins (GPIO 14, 15)

Run the configuration command and follow the instructions below

sudo raspi-config

Select "9 Advanced Options".


Select "A7 Serial".


Select "No".


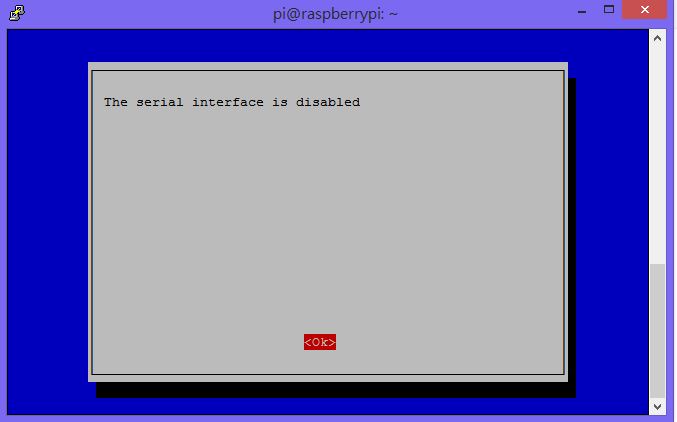
The serial interface is now disabled.


Select "<Finish>'.


Select <Yes> to reboot the system.


After the system is reboot, enter the command "dmesg | grep tty" to check whether the UART is no longer configured as serial console.

**IMPORTANT - for Raspbian Jessie - missing /dev/ttyAMA0**

When you disable the serial port for boot using raspi-config, the serial port is also disabled for ANY use. To fix this you MUST set "enable_uart=1" in /boot/config.txt.

This is really a bug in raspi-config.

/dev/ttyAMA0 is missing in the below output result after running "dmesg | grep tty" after system reboot.


Note, reference to this issue can be found at https://www.raspberrypi.org/forums/viewtopic.php?f=66&t=151922.

How to set "enable_uart=1" in /boot/config.txt

First, issue "sudo nano /boot/config.txt"

Second, scroll down to find the line "enable_uart=0".


Third, change it to "enable_uart=1", followed by pressing Ctrl-X, followed by pressing Y to save the change and exit the nano editor.


Fourth, issue the "sudo reboot" command to reboot the system.

Fifth, issue the "dmesg | grep tty" command to check for the presence of /dev/ttyAMA0.

From the output result below it's clear that ttyAMA0 is now available and we could move on to the next step.


Step 3 - Verify whether the Pi could send and receive UART data by installing the tool Minicom.

First, install Minicom.

sudo apt-get update
sudo apt-get install minicom

Second, short the Rx and Tx pins on Pi (GPIO 14 and 15) so that it will receive the same data as it transmits.


Third, launch Minicom by issuing the command "minicom -b 115200 -o -D /dev/ttyAMA0". Where, 115200 is the baud rate, ttyAMA0 is the port.


Press Ctrl-A, then Z to bring up the menu. Press E to enable or disable local echo.


When local echo is enabled, you will see 2 identical characters when pressing any key on the keyboard. This mean the UART is working correctly.


References:

Raspberry Pi Serial Communication: What, Why, and a Touch of How
https://jeffskinnerbox.wordpress.com/2012/12/05/raspberry-pi-serial-communication/

Raspberry GPIO
https://learn.sparkfun.com/tutorials/raspberry-gpio

Identifying Your Model of Raspberry Pi
https://www.element14.com/community/docs/DOC-78141/l/identifying-your-model-of-raspberry-pi

Read and write from serial port with Raspberry Pi
http://www.instructables.com/id/Read-and-write-from-serial-port-with-Raspberry-Pi/

Blog of Wolfgang Klenk
https://wolfgangklenk.wordpress.com/

Using UART on Raspberry Pi – Python <-- ***Good Read!!***
https://electrosome.com/uart-raspberry-pi-python/

Using the GPIO Serial port ttyAMA0
https://www.raspberrypi.org/forums/viewtopic.php?f=44&t=17360

Using the UART
http://www.raspberry-projects.com/pi/programming-in-c/uart-serial-port/using-the-uart

2016/08/13

Raspberry Pi - Things to do after installing Raspbian Jessie

This is a quick summary. More will be added to the to-do list as I learn more about Raspberry Pi and Raspbian.

Upgrade the packages existing on the machine

pi@raspberrypi:~ $ sudo apt-get update


2016/08/09

Raspberry Pi - Sharing the WiFi connection of the host computer

This is a quick summary of how a Raspberry Pi without internet connection could gain access to the internet by sharing the WiFi connection of the host computer.

The Environment:

- OS on host computer: Win8.1
- OS on Raspberry Pi: Raspbian Jessie

Note, a normal RJ-45 Ethernet cable can be used to connect the Pi with the host computer because the Pi's LAN chip could reconfigure itself for direct network connections (cross-over RJ-45 cable IS NOT needed).

The diagram below shows how the Pi is connected to the host computer.


Steps:

1. Enable Internet Connection Sharing (ICS) for WiFi on the host computer:


2. Connect the Pi and the host computer with a RJ-45 cable. If the Pi is not powered on, power it on now.

3. On the host computer, open up cmd prompt and type in: "ping raspberrypi.mshome.net".


The IP address of the Pi is shown, in the above case, the IP address is 192.168.137.65. Because the Ethernet port on the host computer hasn't been configured correctly, the ping result shows unreachable destination.

4. Modify the IP Address and the Subnet Mask of the Ethernet interface.


For the host computer to communicate with the Pi via the RJ-45 cable, the IP address of its Ethernet port needs to be on the same segment as the Pi's IP address (192.168.137.65). For this case, 192.168.137.1 is selected as the IP address for the host computer's Ethernet port.

5. Use the "ipconfig" command to check the IP address of the Ethernet port connected to the Raspberry Pi.


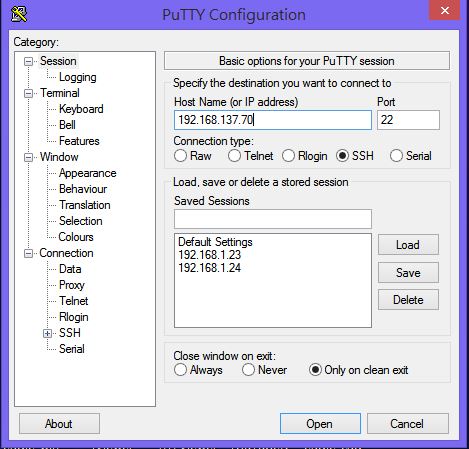
6. Use PuTTY to login to the Pi.


Note, you may notice the IP address 192.168.137.70 used to login to Pi is different from the IP address (192.168.137.65) in the earlier part of this post. When in doubt, use the "ping raspberrypi.mshome.net" command in cmd prompt to find the correct IP address of the Pi.

7. After login to Pi, use the ping command to check for internet connection.


Note,

It's possible to power a Pi via the USB port of a laptop. In the diagram below, the Pi and the smartphone are powered by the USB ports of a laptop.

The smartphone is acting as the gateway to the internet for the laptop via 3G / 4G tethering. The laptop then shares its internet connection with the Pi via the RJ-45 cable.

To find out the IP address of the Pi in the above configuration (for access via PuTTY, etc.), simply issue the "ping raspberrypi.mshome.net" in the cmd prompt window of the laptop.

Here, the IP address of the connected Pi is 192.168.137.46.


Lunch PuTTY and login to the Pi @ 192.168.137.46. Then, issue "ping www.google.com" to verify the connection to the internet.


Reference:

Sharing WiFi Internet connection with Raspberry Pi through LAN/Ethernet (Headless Mode)
https://anwaarullah.wordpress.com/2013/08/12/sharing-wifi-internet-connection-with-raspberry-pi-through-lanethernet-headless-mode/#Striner

Raspberry Pi - Setting up WiFi using USB WiFi Dongle based on Realtek RTL8188CUS chipset

This is a quick summary of how to set up WiFi using USB WiFi Dongle based on Realtek RTL8188CUS chipset.

1. Make sure the Raspberry Pi is power off.

2. Plug in a USB WiFi Dongle that uses Realtek RTL8188CUS chipset to one of the USB ports of the Raspberry Pi.

3. Power on the Raspberry Pi.

4. Use PuTTY to login to Raspbian.

5. Issue the "sudo lsusb" command to list the USB devices attaching to the Raspberry Pi.


6. Issue the "sudo nano /etc/network/interfaces" command to bring up the interface configuration file for editing.


Note from the configuration above that hotplug is supported. That is, if the USB WiFi Dongle is plugged into the USB port AFTER the Raspberry Pi is powered up, the OS is able to detect and enable support for the USB WiFi Dongle. 

Make sure the instructions in the red box above are exactly the same as the 4 lines of instruction below.

allow-hotplug wlan0
iface wlan0 inet manual
wpa-roam /etc/wpa_supplicant/wpa_supplicant.conf
iface default inet dhcp

Press “CTRL + X” to exit nano (press Y and then press ENTER when prompted) to save and exit.

7. Issue the "sudo iwlist wlan0 scan" command to scan and list available WiFi hotspots. Use the scroll bar on the right to scroll through the list.


8. Issue the "sudo nano /etc/wpa_supplicant/wpa_supplicant.conf" command to edit the "wpa_supplicant.conf" file.

Add the following line to the file.

network={
        ssid="YourSSID"
        psk="password"
        key_mgmt=WPA-PSK
}


Press “CTRL + X” to exit nano (press Y and then press ENTER when prompted) to save and exit.

9. Issue "sudo reboot" to reboot the Raspberry Pi.

Verification

1. Unplug the RJ-45 Ethernet cable (if it's still connecting the Raspberry Pi to the router) from and use Advanced IP Scanner to scan for the IP address of the Raspberry Pi's WiFi port.


In my case, the IP address assigned by the router to the WiFi Dongle plugged into the Raspberry Pi is 192.168.1.24.

2. Use PuTTY to login to the Rspberry Pi via its WiFi port and use the ping command to make sure the Pi is connected to the internet.


Note,

- To store multiple SSIDs and passwords for different networks, simply repeat the network={…} code in the wpa_supplicant.conf file for each network.

- The instruction above is for WiFi network that uses visible SSID, for WiFi network that uses hidden SSID, please refer to this post - http://www.dafinga.net/2013/01/how-to-setup-raspberry-pi-with-hidden.html.

References:

How to set up WiFi on a Raspberry Pi
https://www.maketecheasier.com/setup-wifi-on-raspberry-pi/

Setting up Wifi with the Command Line
https://learn.adafruit.com/adafruits-raspberry-pi-lesson-3-network-setup/setting-up-wifi-with-occidentalis

--------------------------------------------------------------------------------------------------------------------------

Product Offered:

USB WiFi Dongle (based on Realtek RTL8188CUS Chipset) - US$4/ea


Description:

- This is exactly the same dongle that I used for writing this post.
- It works with Raspbian JESSIE out of the box. All you need to do is follow the above instruction to make some changes to the configuration files.

How to purchase:

Leave your message in the comment section below and I will contact you for detail.