Install the board support package
1. Check the version of the Arduino IDE and whether it's from Arduino.cc or Arduino.org.
For more detail, see https://www.hackster.io/rayburne/esp8266-01-using-arduino-ide-67a124

2. Because mine is version 1.8.1 from Arduino.cc, I go with the instruction described in this link
https://github.com/esp8266/Arduino#arduino-compatible-ide-with-esp8266-support.
3. Add additional board manager URL to Arduino IDE.
- Launch Arduino IDE, go to "File" -> "Preferences".
- Enter "http://arduino.esp8266.com/stable/package_esp8266com_index.json" into Additional Board Manager URLs field. You can add multiple URLs, separating them with commas.

4. Open Boards Manager from Tools > Board menu and install esp8266 platform.

Wiring
Follow the schematics below to wire up ESP-01 with CP-2102.

Running the sample sketch
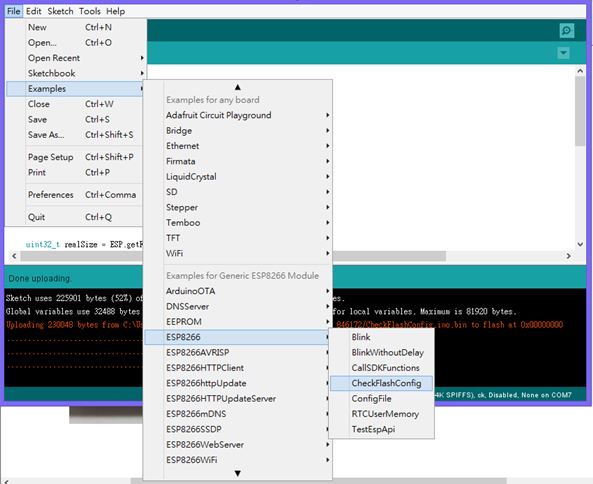
For this post, we will be using an existing sample sketch called "CheckFlashConfig".
For ESP-01 with 512KB of flash memory, follow the settings below.

Be sure to do the following before uploading the sketch to ESP-01.
- Provide external +3.3V to ESP-01 (make sure the +3.3V is connected to VCC, and the GND is connected to GND);
- Plug the CP-2102 module to the USB port of the computer used for firmware upload;
- First close the flash switch then the reset switch so that both GPIO0 and RST of ESP-01 are connected to GND;
- First open the reset switch then the flash switch so that bboth GPIO0 and RST are floating;
- Click on the upload icon to compile and upload the sketch.
If all goes well, the sketch will be compiled and uploaded to ESP-01 and the status is display at the bottom window of the Arduino IDE.

Open serial monitor to see the result. Be sure to set the baud rate to the correct one.

Note,
- It's possible to power ESP-01 using the +3V of CP-2102 for firmware upload and for the uploaded sketch to run normally. No external +3.3V power supply is needed.
- Not sure whether the +3V power output of CP-2102 is enough to power ESP-01 when the WiFi is turned on or is transmitting.
References
ESP8266-01 using Arduino IDE
https://www.hackster.io/rayburne/esp8266-01-using-arduino-ide-67a124
Arduino core for ESP8266 WiFi chip
https://github.com/esp8266/Arduino#arduino-compatible-ide-with-esp8266-support
Arduino IDE for ESP8266 Quickstart Guide
https://hackaday.io/project/5150-arduino-ide-for-esp8266-quickstart-guide
No comments:
Post a Comment